Showing posts with label Hand drawn. Show all posts

Friday, May 9, 2014

Latest Classes, Sneaky Peeks and new Paints

Went to visit my Grandmother in Burnley yesterday which means I have to drive through Harrogate to get to Skipton. Which means I had to drive past Art from the Heart! Sacrilegious I hear you cry! So I popped in on the way home instead, Ha Ha! It would've been rude not to really. :) I had to go stroke some of the new Dina Paints anyway! Of course they just jumped into my basket, those lively little buggers. I bought 5 to play with.


I'll be back into Art from the Heart on Thursday next week on the 15th of May as I'm teaching my She Art canvases class (pics below). Lots of gorgeous layers in the background I love it. I'll be providing templates of 6 girls all hand drawn by me with interchangeable heads!


I've discovered a new product that I love too, I don't know why I've only come across them now, but I LOVE them! It's the Faber Castell Big Brush Pitt Pens. Now I thought these were just big felt tip pens last year and I didn't really give them a chance. But after playing with them this week, they are much more than that, and a mixed-media artist's best friend. You can move the ink around with your finger and get amazing results. So we're going to be using these too to have a play with them on Thursday, so if you want to come and join in there are a few places left HERE

****************

It's sneaky peaky time. 
Below is a sneaky peak of a canvas I'm teaching at Barnsley on the 31st of May at The Craft Box, playing with all the latest PaperArtsy paints and JOFY stamps. Looking forward to finally meeting Lynn who runs the shop too :)


**************

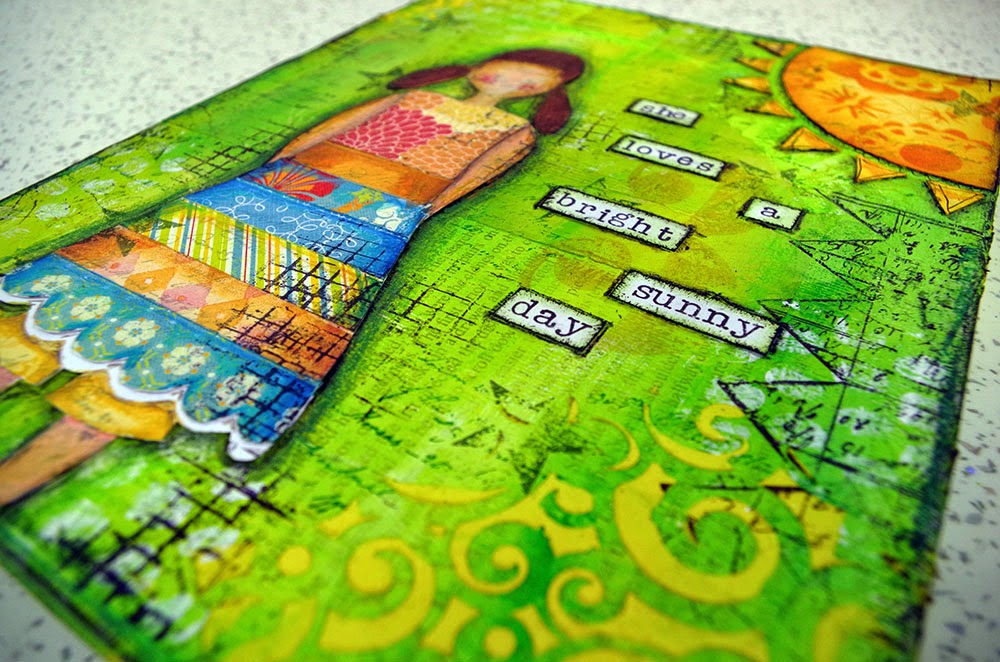
Here's another very close sneaky peak of the canvas I'm teaching on the first day of my Mixed-Media weekend at Wynyard Teesside on the 26th and 27th of July. This one makes me very happy. It's a place I always like to be at! Any guesses where it is?

You can book your place on the Art Workshops page on Facebook (just send them a message), or email Sue Tucker on  sue.tucker1@btopenworld.com to secure your spot.


I'll have another sneaky peak for the Sunday's project when I've finished it :) xx

I have lots to be getting on with these next few weeks as its Preview Day at Art from the Heart on the 14th of June and I need to get the new class projects finished (time is running out and I'm back at work on Monday! eeek!) then prep the preview day taster class too. It's a corker!

Oh and fill a restaurant full of paintings too.
I like to be busy! Or crazy maybe 
Have a great week
Michelle xxxxxx


Latest Classes, Sneaky Peeks and new Paints
Read more ...

Sunday, March 16, 2014

She was in charge of her own destiny

I'm loving this sunny weather, it means I can get in the garden and get an early start on the Spring clean up. I hope the snow doesn't come back and bite us in the butt though!

Today I felt like a bit of drawing, so these little iddy biddy (4" x 4") canvases just needed something small and dainty on them, so I drew the house, the flowers, the mushrooms and the girl under the tree. I drew them on paper and coloured it with promarkers, then cut them out and stuck them on with gel medium.  I painted the tree directly onto the canvas, (love the way that it continues around the edge).


Here's a little walkthrough. Get 2 iddy biddy canvases and stick lots of bits of paper and washi tape on them with gel medium. (Yes even the phone book didn't escape this!)


Paint up the canvases with 3 paints, here I used, teal, white and lime green.


Edge with gold paint and stamp a text stamp with dark blue paint.


Add gesso and a bit more teal paint to knock back the harsh colour. 
Add some background stamping and some coloured texture paste through a stencil.
Then rub the edges of the canvas and the raised bits of the paste with Treasure Gold.


Here's a close up of the house with it's climbing plants and the mushrooms.


You can see the raised texture of the paste.


I always invite the edges of the canvas to the texture party :)
Here I've also used Kate Crane's amazing self made stamps (arrows).
Kate sells her handmade stamps on Etsy, but you gotta be quick, they sell out fast.  


Off to have a nice soak in the bath, we did 26,000 steps yesterday walking round Newcastle before the Russell Howard gig and now I'm aching!
Have a great week 
Michelle xx

She was in charge of her own destiny
Read more ...

Friday, April 26, 2013

Wisteria Framed Door for Creative Expressions


Every now and again I like to get back to basics and get my colouring pencils out. I love this Gothic Gateway door stamp from Creative Expressions. People may already know I have a thing about old doors, as I've mentioned before in previous posts. 


In my own little fantasy world I thought of beautiful hanging Wisteria flowers around the door, but I didn't have a stamp so I just drew them on. I adore the colour against the kraft card.

I've used Prisma Colour pencils, they have very yummy high pigmentation hence the vivid colour, they're a bit pricey but worth it.


I started with the stamp and just a brown pencil


Added some highlight from a white pencil


I drew some branches, and then just coloured in lots of foliage and the flowers.


 I love the blue and the purple together, against the door. 


I know who I'd like to give this to :)


The sentiment is from the Beaded Swirl set from Creative Expressions too.

The weekend is nearly here, and it looks like it's going to be a sunny one, I hope so, I still have so much to do!
Have a good one.
Michelle x
Read more ...

Thursday, October 4, 2012

Hanging Skulls Halloween Canvas

Over at It's Crafting Time blog the theme this week is orange, black and yellow, which immediately shouts Halloween given that it's October. I thought I would make a dark scary canvas, with the hanging skulls and the all seeing eye on the bottom bit.

I don't have a walkthrough on this post, I got carried away and forgot to take photo's. So I started off by doing a base coat of orange paint and then added layers of yellow paint, black Dylusions spray & orange drips.

I've used Tim Holtz tissue tape, Halloween stamps, and the Sizzix Graveyard die. Dylusions harlequin and number jumble stencil. 


I painted the tree directly onto the canvas. I love the way it goes round the side.


I used the Crafters Workshop number stencil on the bottom half with black Dylusion spray. Then I decided to paint in an eye. It looked like there was one there, so I went with it! The letters are from Studio G little wooden alphabet stamps. I love these little stamps. I have loads of them.


Will you be getting dressed up for Halloween?
Michelle xx
Read more ...

Sunday, September 2, 2012

Love Life Challenge Thee Tag

Well me and Trace Metcalf from inkypinkycraft have been on the phone again finding out what stash we both have and coming up with an 'I Challenge Thee to make something' list. This wonderful idea was started off by Hels Sheridan and Ellen Vargo with their 'I challenge thee' makes. Hel's last one is HERE and Ellen's is HERE.

So here is the list that me and Trace came up with this time:

Trace suggested using my free digi stamp - Love Machine Heart
A Tag
Some Foil or sheet metal
Alcohol ink
Paint
Gesso
Distress ink
Tim Holtz stamps
Embossing powder or folder
Mica powder
And some lettering

Plus 1 secret ingredient


And here's what I came up with........

Have you spotted my secret ingredient?.......yes it's wax!
I dripped wax down the tag and brushed it with Perfect Pearls, I just love this effect. 


This tag started life being vivid blue (done with alcohol inks) with fancy script and flourishes. And in true Donna Downey style I changed how it looked by scraping red and white acrylic paint with a pallet knife down the middle to make it look grungy


I cut the whole out of the heart where the cogs are and wrapped it kitchen foil. I put sequin waste over the heart and ran it through my Big Shot. Now I had my metallic embossed heart..fab. 

I snipped into the foil where the hole was in the card and peeled back the layers to make it look like it had been ripped open. I dripped a few drops of red, copper, gold and black alcohol inks on the embossed metal. I printed off the heart again and coloured in the cogs and stuck it beneath the metal heart. I stuck them both onto the corrugated card and cut out the heart shape.

I heat embossed the TH wings behind the heart.


I've used distress paint on the grunge board letters and edged it with red paint. I love that crackled Blue China paint! Then I dripped wax down the whole tag and brushed it with gold Perfect Pearls mica powder. 


I can't wait to see what Trace has come up with.

We've already started cooking up the next one, so far we've come up with art parts and Idea-ology.
Ooooooo mind is already running a muck?

Read more ...

Tuesday, August 28, 2012

Beautiful Reasons to Bee Happy

I've been looking for a reason to get my Inktense blocks out, and this was one beautiful reason. I'm out of my journal again and onto my canvas, Dina Wakely's Out of the Journal is making my craft room very colourful, I love hanging them all around the room.


I started a canvas with masking tape and made a gorgeous teal & phthalo turquoise background. 


I just started to draw flowers with my Inktense blocks and then painted them in with a little water and gesso. The colours were bright, but not bright enough so I went in there with my oil pastels to make the flowers more vivid. I really like the intense colours. I used interference violet Golden Paint on the bee's wings, it looks cool close up. The Bee stamp is from Spring Tinchies which you can get from Its Crafting Time.


Little Felix is still growing bones fast asleep with his paws in the air!


Read more ...

Tuesday, August 14, 2012

Don't Hide in the Shadows Let your Light Shine

Well it's been a few days since I blogged and that's because I've been babysitting my new kitten, who was called Sylvester, then he was Paco and now he's Felix. He nearly got Mo after Mo Farah but he's way too lazy to be Mo. Felix is the incredible sleeping cat!......growing bones is a tough job ya know!

Anyhooo...on with my journal page which is a bit on the deep and meaningful side. I think this is supposed to be representative of my shy side, if you knew me you would think... Michelle shy...Naaaa.....however I'm not a fan of being the centre of attention and tend to hide a little bit. I'm sure it's just the thought of having to do Power Point presentations, they just scare me to death!.....so I try to avoid doing them.


This page has been made with acrylic paints only and one stamp, the Tim Holtz sun burst stamp. I drew the face with the paints as I was going along.


I've used the Golden liquid acrylic interference blue paints on here too, they don't photograph well but they look amazing with the naked eye.

Righto back to playing with a mouse on the end of a stick!
Bye xxxx
Read more ...

Tuesday, August 7, 2012

Happy & Bright Dylusions Flowers

I've not been in the craft room much seeing as I'm babysitting my kitten. We did name him Sylvester but we've changed it to Felix, he looks more like a Felix to me.

I gave myself a little challenge of making a journal page with only using Dylusions inks in a waterbrush pen. So I made the flowers, the blue background and the grass. Then I used some gesso on a Dylusion flower stencil around the edge. I used the waterbrush pens again to colour some of the flowers around the edge.I also restricted the use of stamps, until I caved with the black dots, Tim's butterlies and the two mushrooms.  I did think if Dylusions were flowers the world would be a brighter place. So I wrote this with the black ink.


Read more ...

Friday, August 3, 2012

Innocence Journal page

I started this face in Kate Crane's drawing class at Art from the Heart way back in May. I was thinking along the lines of an innocent baby face when I made it, but my family think it's like an alien. I don't want it to be like an alien, so it's still a baby face to me.

The outline was drawn with a paint brush using my non dominant hand, then I coloured in the face using Derwent Inktense blocks and gesso with my dominant hand (I'm not that good to do the middle with my non dominant hand!). 

I love the fact that we painted it on a Yellow Pages page, but also that it's upside down! These little touches are genius! I really love doing art classes because they make you think sideways away from your comfort zone.


On the journal page I've used Dylusions Inks, Tim Holtz stamps & Tissue Tape, Indigo Blu stamps, and an old brass sun burst stencil which I used a baby wipe to bleach some of the inks out with.

I'm off to Art from the Heart tomorrow, I'm looking forward to being surrounded by greatness once again.
Tara  xx
Read more ...

Tuesday, July 31, 2012

Free Love Machine digi stamp

I'm so chuffed to have reached 100 followers that I wanted to thank you by making a freebee digi stamp to give away. I asked Trace from InkyPinkyCraft what stamp she would like to see and she suggested a grungy heart, I figured Trace loves cogs then why not make cogs inside a heart and my Son said with his mega deep voice call it a Love Machine and the rest is as they say history.

I wanted to show you my take on the stamp, so I made this tag. As you can see I'm obviously using my time off work being very productive, imagine what I'd be doing if I won the lottery at home all day! I wish................


I used:-
A white tag
That Special Touch cog mask to emboss the tag
rub n buff silver, purple & green.
Black soot DI
TH cog & clock
Crown charm
spiral paper clips (my fav thing at the moment)
Stampendous Frantage embossing powder & mica flakes
I coloured the heart with Promarkers
Coated the red area with Rangers Rock Candy.

I'm entering this tag into Try it on a Tuesday - Anything goes challenge, I'm in early this time!

Now to give you my digi stamp & sentiment.....I have made it a PNG rather than a JPEG so you can have a transparent background. 

I would like to ask if you use this digi stamp please will you reference it to Michelle Webb and I'd really appreciate a link back to this blog, thanks a million xx. Right click the image and save to your computer.

I would really love to see what you make as well, so let me know and I will pop over and have a look.
Thank you for following me xx

Love Machine heart & sentiment - designed by Michelle Webb


Enjoy xxx


Read more ...

Tuesday, July 3, 2012

Snap Happy Tag

I've been itching to buy some Golden paints since my class at Art from the Heart last month. So I thought I would treat myself and buy some payday paints. I got a delivery of 5 Golden paints yesterday and I wanted to play with them as soon as possible. The mop up tag I had from the 'What's your poison' canvas was just the ticket, for some painty experimentation.


I used the rest of my modelling paste from the last canvas with a flower stencil to give some texture to the tag.

I used some Pashmina Glimmer Mist, Interference blue and green & magenta Golden paints on the modelling paste to give the flowers some depth. I really love the effect of the interference paints.


I used Tim Holtz film stamp, film acetate strip, family photograph stamp, number plaque and tissue tape.
I used Stampendous Frantage aged aqua embossing powders too.


I drew my own little heads on the film. They look like they're having fun.
Oh and I used Adirondack alcohol inks on the number plaque & the acetate film strip.


Happy snapping x
Read more ...

Friday, June 8, 2012

Home is where the ink & paint is!

Home is the place to be right now with this rainy weather. I'm not complaining though, I have to occupy myself somehow, and I don't need any encouragement to get my inks and paints out. I thought I would make a happy little scene of "Home is where the ink & paint is", and the heart of course!


I first primed a 30 x 25cm canvas with gesso, and left it to dry. Brushed some blue and green acrylic paint across the canvas until I was happy with the result.


I drew this quirky little house.


I sprayed a page in a book with Dylusions Inks, Cosmic Shimmers and Radiant Rain, drew the letters for the    caption and cut them out.


I used Balzer Design's Crafter's Workshop stencil on the bottom with some Forest Moss green TH Distress ink. I used a flourish mask to give the illusion of clouds and I really like how it looks. I also used a Dylusion's number jumble stencil here and there. The frayed material stamp around the edge is from The Stamp Man. I flicked some yellow, black and white paint at the canvas and used a lid for the circles.


I drew the heart flowers and painted them direct on the canvas then I tore two thin pieces of green card stock for the flower bed. I painted a page in my book with gesso and cut out some fence posts and cross bars from the page and stuck them on the canvas to make the fence. I really like the way the fence had turned out. I did some shading with some Caran D'Ache pencils at the base of the fence posts and the house.


A happy little painting for my craft room wall.
Michelle x
Read more ...
Related Posts Plugin for WordPress, Blogger...